Holiday Themed Altered Gumball Machine
I love to repurpose vintage items and incorporate them in my pieces. A few months ago, My husband and I drove to Raleigh, and went to this colossal flea market held every weekend at the fairgrounds. I happened to walk by this table, and came across this vintage looking Jelly Belly gumball machine. The first thing that came to my head when I saw it was Christmas. It was my find of the the day, and a steal for only ten bucks. My idea was to transform this gumball machine into a beautiful snow globe. I hope you like the results! The steps for this project are listed below.

Step 1. Disassembling the Machine
I disassembled the machine using a flathead screwdriver. I stored the smaller parts that I did not intend to alter in a gallon size zip lock bag.

Step 2. Selecting the Embellishments and the Epherma

I used pieces from the Tim Holtz Idea-Ology 2017 Christmas line. If you have not seen his 2017 Christmas release, you really need to check it out. I am in love with all of it. The 2017 Tim Holtz Idea-Ology Christmas line can be found online and at most Michaels Craft Stores in the U.S. Below, is a user friendly list of the exact items and quantities used for this project.
Project Supply List
1- Tim Holtz Salvaged Santa (colored with red and black craft paint)
3- Tim Holtz Alpha Dice Red (JOY)
6- Tim Holtz Baubles (paint-Tim Holtz Distress Paint in Brushed Pewter, and Tarnished Brass)
1- Tim Holtz Christmas Deco Sheet
2- Tim Holtz Decorative Deer (painted with brown craft paint, red craft paint for noses)
1- Tim Holtz Christmas Quote Chip (Wonder Land)
1- Tim Holtz Tiny Bell
2- Tim Holtz Christmas Typed Token (25, merry)
1- Tim Holtz Christmas Metal Word-band (May your days be merry and bright)
Several Tim Holtz Remnant Rubs (Gilded Christmas)
1-Tim Holtz Metal Star (painted metallic green)
Snippets from the Tim Holtz Christmas Epherma
1- Tim Holtz Salvaged Doll (brown craft paint-hair, green metallic paint-dress)
Tim Holtz Distress Paint (Brushed Pewter and Tarnished Brass)
1- Elf on a Shelf mini doll
2- Craft mini toy train pieces
2- Craft mini candy canes
2- Craft mini gift boxes
4- Craft mini candy pieces
4- Strands of pine garland
Red and white ribbon
Fake Snow
Green metallic, red, brown, and black craft paint
Step 3. Mixed Media Magic (Imagination)
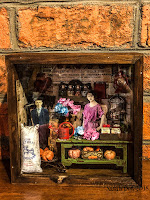
My vision for this piece was Santa hiding behind a tree with his reindeer trying not to be seen by a little girl who is sneaking a peak at her gifts (as the elf watches from atop the tree). That brings me back to my childhood and my mom telling me “the elves are always watching” so my brother and I would be good. My mother put those mini elves all over the house around the holidays. It was a great parenting tactic. Lol
I wanted to keep the integrity of the structure as original as possible. The only piece I decided to remove is the the plastic dispenser cover as it has a small chip on it. I started on the base first and cut a piece of the Tim Holtz Christmas Deco sheet in a circular pattern to give it the look of a tree skirt. Next, I wrapped the woodland garland around the rod in the middle of the structure to look like a Christmas tree. Once the garland was set in place, I attached the Elf on a Shelf to the tree. My next step was to complete the painting of the embellishments (The colors used on each item are on the list above). I waited about 45 minutes for the items to dry and began fitting the embellishments around the tree. The adhesive I used is called Gorilla Glue Gell. It is my go-to glue for small pieces. Below is a progress picture.

The last few things I did in this project was to apply the Tim Holz Remnant Rubs to the base, apply woodland garland and candy canes around the middle base, add faux snow inside the globe, and a candy topper on the top. Here is the finished product:


I hope you like my Altered Christmas themed gumball machine. Have a great day!

Comments
Post a Comment