Christmas Gift Shadowbox

Hi everyone! Now that Halloween is over, Christmas crafting has begun! This piece is a unique spin on a shadow box. I wanted it to have the look of a Christmas gift box. I am quite pleased with the results. I did two separate sizes, a small 4x4 and a medium 5x5 size gift box. I picked these boxes up at my local Hobby Lobby Craft Store for under $4.00 for both. I wanted to use the beautiful flannel patterns from the Tim Holtz 2017 Christmas Mini Paperstash. Below is the supply list and steps for this project.
SUPPLY LIST
- Tim Holtz Christmas Mini Paperstash (4 patterns 2 Sheets each)
- 4x4 and 5x5 Paper Mache Gift Box (Hobby Lobby)
- Tim Holtz Collage Medium
- Tim Holtz Salvaged Dolls x3
- Tim Holtz Salvaged Santa x2
- Tim Holtz Metallic Deco Sheets x3 (2in width strips to line boxes)
- Craft Mini Trees x2
- Craft Mini Gift Boxes x7
- Tim Holtz Christmas Baubles x6
- Tim Holtz Adornment Stars x3
- Tim Holtz Christmas Metal Typed Tokens x3(wonder, joyful, festive)
- Tim Holtz Christmas Decorative Deer x2
- Tim Holtz Christmas Epherma Snippet
- Tim Holtz Woodland Mini Tree x1
- Tim Holtz Alpha Dice Red ( NOEL)
- Tim Holtz Tiny Bells x4
- Tim Holtz Quote Chip x1 (MAGIC)
- Tim Holtz Adornments Ice Skates x2
- Tim Holtz Trophy Antlers x1
- Tim Holtz Corked Dome x1
- Baroque Frame x1
- Craft Mini Peppermint x1
- Tim Holtz Hitch Fastener
- Mini Red Ribbon x2
- Star Toppers x2
- Craft Mini Candy Canes
- Gold Leaf Silver Metallic Rub (Stars, Baubles)
- Craft Paint black, red, green (Salvaged Santa’s and Dolls)
I started by choosing the paper. I used 2 different patterns from the Tim Holtz Paperstash for the outside and inside of the box. Using a ruler, I cut each piece to fit the sides and decoupaged each piece to the sides of the paper mache box starting with the outside first. Once dried, I used the Tim Holtz Sanding Block to smooth the edges of the box where overlapping occurred.

Once the Outside was completed and sanded, I did the same steps to the inside with the second pattern I selected.

After Both patterns were applied and dried, I went through and applied Collage Medium over entire decoupaged area to ensure a good seal and sheen.
To finish the corners of this project, I used Tim Holtz Silver Metallic Deco Sheets and applied them in 2inch thick strips over the exposed corners. (Tim Holtz Metallic Tape is a good alternative if unable to find Deco Sheets.) See Below Pics after Deco sheet application.


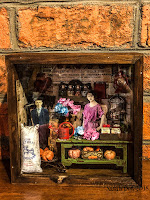
I went through all the edges and added a small bit of glue to ensure The Deco Paper would not lift. It was now ready for embellishing. I used mostly Tim Holtz products on both boxes and a few Craft Mini pieces. On the bigger box, I created a Mini Snow globe using a tiny amount of beaded snow, a Tim Holtz Corked Dome, and a Tim Holtz Mini Tree. I used craft paint to paint the Tim Holtz Salvaged Santa’s and Salvaged Dolls. I used Goldleaf Silver Metallic Rub for the Tim Holtz Adornment Stars and Baubles. For the box toppers, I used thin stars and attached 2 Tim Holtz Tiny Bells and a Tim Holtz Typed Token on each.

The Finished Product is below and I could not be happier with the outcome! Thanks for stopping by! Have a great day!


Comments
Post a Comment