Posts

Robot Vignette Box

Image
Hi everyone! I have had numerous requests for a tutorial for my Robot Vignette Boxes. I finally have had some much needed down time from classes to get this done. Here is the step by step process to these adorable little boxes. I took apart the latches on my unfinished wood box and used two different types of paint. The first paint applied is Tim Holtz Distress Paint in Black Soot. Once dried, the second paint I applied directly over the Distress Paint is FolkArt Extreme Glitter Paint in Black. Once dried it gives a really cool glitter effect that makes the box pop. The second step is to gather all the pieces: 1-Tim Holtz Adornments Foundry (Electric), 2-Tim Holtz Mini Gears (Used as base under Hardware Pull), 2-Tim Holtz Pulley Wheels, 1- Tim Holtz small Configuration Box Insert (Smallest Size Square Box), 1-Tim Holtz Mini Hardware Pull, 1-Tim Holtz Light Bulb (Retired), 1-Rectangular Wood Piece (Robot Head), Tim Holtz 3D Gear Embossing Folder, 1-Sheet of Tim H

Garden Themed Shadow Box

Image
Hi everyone! Since spring is right around the corner I wanted to share my garden themed shadow box. I have been obsessed with Shadow Boxes since I was a young girl. I love to create vintage that tell scenes tell a story. Tim Holtz’s Paper Dolls make it easy to bring these boxes to life. I started with an unfinished wood shadowbox and used Tim Holtz Distress Stain in Gathered Twigs and Espresso. By using the two combined colors, I was able to create a contrasting color that pops. Next, I used crackle paint and Ranger Dylusions paint to get the desired color. I wanted a weathered green to go with the garden theme of the box.   For the paper portion of my shadowbox: I used Tim Holtz Memoranda paper for the background and distressed it with his  Distress Crayons and Ink in Vintage Photo and Walnut. I colored the Paper Dolls using Seedless Preserves, Blueprint Sketch, and Black Soot Distress Crayons. Lastly, I used Tim Holtz Mermaid Lagoon Distress Spray Stain

Christmas Gift Shadowbox

Image
Hi everyone! Now that Halloween is over, Christmas crafting has begun! This piece is a unique spin on a shadow box. I wanted it to have the look of a Christmas gift box. I am quite pleased with the results. I did two separate sizes, a small 4x4 and a medium 5x5 size gift box. I picked these boxes up at my local Hobby Lobby Craft Store for under $4.00 for both.  I wanted to use the beautiful flannel patterns from the Tim Holtz 2017 Christmas Mini Paperstash. Below is the supply list and steps for this project.                                                                                                                                                                                                                                      SUPPLY LIST Tim Holtz Christmas Mini Paperstash (4 patterns 2 Sheets each) 4x4 and 5x5 Paper Mache Gift Box (Hobby Lobby) Tim Holtz Collage Medium Tim Holtz Salvaged Dolls x3 Tim Holtz Salvaged Santa x2 Tim Holtz Metallic Deco Sheets x3 (2

Holiday Vignette Box

Image
Hello everyone! I love making shadowboxes of all shapes and sizes. They are perfect for decorating your home for the holidays and gifting to family and friends. Today, I will be making a simple Vignette Box using Tim Holtz’s Idea-Ology Christmas Line.                                                                                                                                                                                       Supplies Supply List 1- Tim Holtz Vignette Box (Large) 2- Tim Holtz Finial Pieces  1-Tim Holtz Christmas Cabinet Card Frame 1- Tim Holtz Adornment Souvenir Camera 1- Tim Holtz Adornments Stars 3- Tim Holtz Baubles 2- Tim Holtz Christmas Paper Dolls  1- Tim Holtz Tiny Bell 1- Tim Holtz Christmas Typed Token (Believe) 1- Craft Mini Sled 2- Craft Mini Gift boxes 1- Craft Mini Tree GoldLeaf Rub-On Color Tube (Finial Pieces, Baubles, Star, and Camera) Assembling Process   Carefully undo the Tim Holtz Christmas Cabin

Holiday Themed Altered Gumball Machine

Image
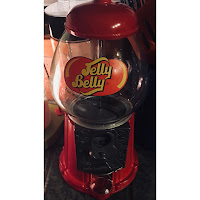
I love to repurpose vintage items and incorporate them in my pieces. A few months ago, My husband and I drove to Raleigh, and went to this colossal flea market held every weekend at the fairgrounds. I happened to walk by this table, and came across this vintage looking Jelly Belly gumball machine. The first thing that came to my head when I saw it was Christmas. It was my find of the the day, and a steal for only ten bucks. My idea was to transform this gumball machine into a beautiful snow globe. I hope you like the results! The steps for this project are listed below.                                           Step 1. Disassembling the Machine  I disassembled the machine using a flathead screwdriver. I stored the smaller parts that I did not intend to alter in a gallon size zip lock bag.    Step 2. Selecting the Embellishments and the Epherma   I used pieces from the Tim Holtz Idea-Ology 2017 Christmas line. If you have not seen his 2017 Christmas re